Tuesday, December 18, 2012
HOPE
Check out my new blog Ivory Bloom!
Free printables, creative ideas and art community.
This message of hope was wonderful to hear again!
Season of Joy
Free printables, creative ideas and art community.
Joy to the world
The Lord has come
Let earth receive her King
Tuesday, November 20, 2012
Nativity Blocks
Check out my new blog Ivory Bloom!
Lots of FREE printables, creative ideas and an art community.
My boys had fun helping me paint these blocks.
I love nativity sets like this where the kids can play with them!
Here is the set Inger and I created for UL.
Saturday, November 3, 2012
Cute Caleb!
Check out my new blog Ivory Bloom!
Lots of FREE printables, creative ideas and an art community.
I am at a scrapbooking retreat and I'm sorting through A LOT of photos.
Here is one of Caleb that is just too cute!
Taken Feb. 23, 2010
Funky Flowers
Lots of FREE printables, creative ideas and an art community.
I had a great weekend creating art with my sister, Beth.
We took over her entire kitchen and created all night long.
Friday, November 2, 2012
Trash to Treasure
My neighbor was throwing away one of her kitchen chairs.
I spotted the bottom part by her garbage can and asked her if I could have it.
She laughed, and said, "If you really want it!"
{i'm sure she thought I was crazy}
I spotted the bottom part by her garbage can and asked her if I could have it.
She laughed, and said, "If you really want it!"
{i'm sure she thought I was crazy}
I knew it would make a fun "table" for my front porch.
Painted the seat yellow and then used tape to mask off stripes.
I wanted fun yellow stripes when it was all done.
Fun transformation!
Wednesday, October 17, 2012
Painted Pumpkins
Lots of FREE printables, creative ideas and an art community.
My sister, Jean, and my friend, Inger, came over for a fun filled Saturday of painting.
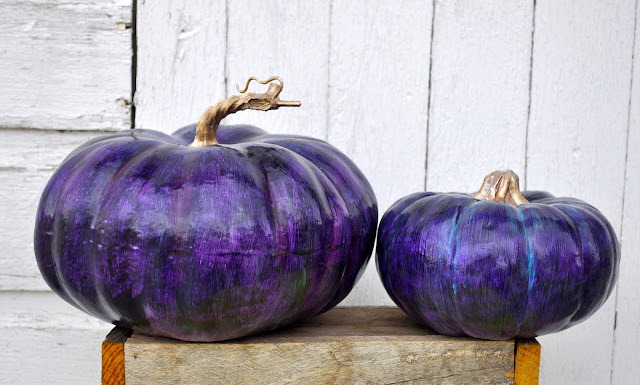
This is what we created!
We got this fabulous idea from Brave Girls Club.
First: Find Your Pumpkins
We used plastic pumpkins as our base.
We just looked for a great shape, color doesn't matter because you'll be painting over them.
Second: Clean Pumpkins and Spray with Primer
Clean the pumpkins with a clorox wipe to get rid of any dirt, grease or dust.
Then spray BIN primer all over the pumpkins
to make sure the acrylic paint will stick to the plastic and not peel-off.
Be sure to flip the pumpkins over so you can paint the bottoms.
Third: Gather Paint and Supplies
Gather acrylic paint, glossy Mod Podge, fingernail polish, etc.
Any brand of paint will do. The heavy body acrylic paints go on more smoothly (they are also more expensive). Regular craft paint will also work.
Fourth: Paint Base Color
Fifth: Mix Mod Podge with a little bit of paint to add accents to the pumpkins.
Paint darker colors in the low spots and lighter colors on the high points.
The Mod Podge will dry clear, and it gives the paint a translucent look.
Just keep adding paint until you achieve the look you want.
Inger found a great pack of small pumpkins at Michaels for only $5.
My sister, Jean did more distinct accent colors. They turned out so cute!
Remember, if you don't like something... just paint over it!
There is no "right" way to paint. Just keep layering the colors to add depth and interest.
Just have fun!
Let the paint dry between coats. We put ours outside so they would dry faster.
Put a finishing layer of Mod Podge over the entire pumpkin when you are done. Especially if small hands will be touching them or if you want to display them outside.
Finish off the stem with metallic paint... we used fingernail polish!
Adds that finishing touch.
Subscribe to:
Comments (Atom)


